Build and publish a CLI tool with Node.js
"Learn by building projects" is a great way to learn technologies very quick, so we will follow this enlightened advice to build a cool cli tool.


Beginners will love to program each day if they can stick to only one principle of motivation while coding is "Learn by Doing" or "Learn by building projects". Here in this blog I will show you how to make a practically useful CLI based tool in nodejs. Also we will publish our project globally with the help of npm.
Let's get started.
prerequisites:
You should be familiar with JavaScript and basic Nodejs.
Theory: But what you gonna build?
Very good question, the best way to learn is by building projects we all know that, but what to build is the question. So, always remember this advice.
"Don't just build projects for just the sake of building it, instead build projects which solves real life problems of yours or others, this will not only makes you how to program and be a master programmer, but also it will allow you to think as a problem solver also."
What is the problem?
I had this problem that I solved by building this project. The intention behind this project is that when I was reading pdfs documents in my free time, I simply want to know the meaning of several words, so I open browsers to search for that word.
But this is very annoying because when I search for words, then at the same time notification came and I spend my time in watching youtube and started surfing the internet, and I waste a lot of time. So for the sake of my productivity and to avoid distractions. I come up with this idea, "what if I can search the meaning in my terminal as I use terminal a lot". Also I open documents with terminal. By simply type:
evince <document-to-open>
evince is my favorite pdf reader program.
From this idea in mind we will make a terminal based dictionary tool which will fetch word's meaning and prompt it's meaning in our terminal using Nodejs.
You can check this npm package I made called word-meaning(a very appropriate name IMO) which fetches data from API called dictionaryapi.
So we will build the same "word dictionary search tool" in nodejs and later publish it globally with npm.
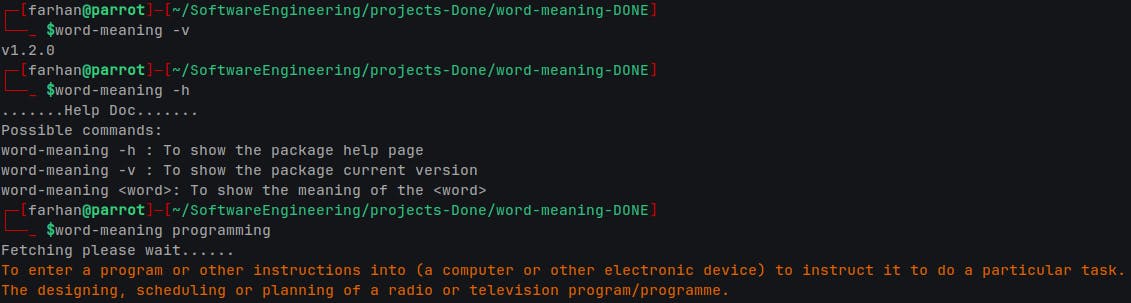
This is how it works.
$ word-meaning -h
.......Help Doc.......
Possible commands:
word-meaning -h : To show the package help page
word-meaning -v : To show the package current version
word-meaning <word>: To show the meaning of the <word>

$ word-meaning -v
v1.2.0

$ word-meaning love
Strong affection.
(usually transitive, sometimes intransitive, stative) To have a strong affection for (someone or something).
Since this projects is entirely open-source so you can too optimize it by contributing in the project and add features for good. I will definitely merge your PR for sure.
Github repo: https://github.com/maverick-farhan/word-meaning
Practical: Word dictionary tool in Nodejs
Step 1: Configuring the project
Make a directory(folder) in your preferred place, in this directory all our project's files will resides.
mkdir word-meaning && cd word-meaning
Now you created a folder named "word-meaning", (you should use relevant names for your projects always).
First we need to initialize this project as a npm project, so for this type below command to create a package.json file:
npm init -y
npm init is a very powerful command as it initialize this entire project as npm package. What it actually does is, it can track, manage, and helps to deploy our project . You only have to do npm init when you're first creating a project. It essentially just creates the package.json file. The -y flag when passed to npm init command tells the generator to use the defaults instead of asking the usual questions.
Now check your directory you will see a package.json file created automatically. This file will track your project's dependencies and it's versions.
Inside Package.json file:
{
  "name": "word-meaning",
  "version": "1.0.0",
  "description": "",
  "main": "index.js",
  "scripts": {
    "test": "echo \"Error: no test specified\" && exit 1"
  },
  "keywords": [],
  "author": "",
  "license": "ISC"
}
Power of package.json file
The most power file in the entire project is this file package.json. If you build this project and just share this file to your friends, they will have the same packages that you have. As I said before, package.json tracks the project's dependencies and versions. Dependencies is nothing but packages used to build your project.
Now it's time to add more configurations in package.json file
Configuring package.json file
{
  "name": "word-meaning",
  "version": "1.0.0",
  "description": "Word meaning dictionary tool in nodejs",
  "type":"module",
  "main": "index.js",
  "scripts": {
    "start": "nodemon index.js"
  },
  "bin": {
    "word-meaning": "index.js"
  },
  "keywords": ["word-meaning"],
  "author": "Your Sweet name",
  "license": "MIT",
  "dependencies": {
    "chalk": "^5.3.0"
  }
}
We good to go further and configuration task is completed now.
Step 2: Real Coding
Create a index.js file and this is going to be our main file which executes our project and which will fix our productivity issue.
touch index.js
Choose any text editor or IDE of your choice to develop this project. I use Visual Studio Code so I will stick to it.
Add this #!/usr/bin/env node in top in index.js, this should be our first line in index.js file***.*** What this will do is it will search for node in $PATH and then start with the first one they can find to execute the index.js file with node as runtime or interpreter. As you all know that node is nothing but a javaScript runtime environment.
You remember that we wrote a bin command in our package.json file? What it does is it will find the executable file which is index.js in our case to execute as we soon we find node in our $PATH variables.
 "bin": {
    "word-meaning": "index.js"
  },
 #!/usr/bin/env node
import chalk from 'chalk';
//Fetch Location:  https://api.dictionaryapi.dev/api/v2/entries/en/<word>
const input = process.argv;
const currentVersion = "1.0.0"
const printMeaning = async(word)=>{
try{
if(input[2]=="-h"){
console.log(".......Help Doc.......");
console.log("Possible commands:")
console.log("word-meaning -h : To show the package help page")
console.log("word-meaning -v : To show the package current version")
console.log("word-meaning <word>: To show the meaning of the <word>")
    }
else if(input[2]==='-v'){
        console.log(`v${currentVersion}`)
  }
else if(input[2]!=='-v'){
    console.log("Fetching please wait......")
    const response = await fetch(
        `https://api.dictionaryapi.dev/api/v2/entries/en/${word}`
        );
        const data = await response.json();

        data[0].meanings.map((meaning)=>{
        console.log(chalk.blue(meaning.definitions[0].definition));
        });
}
else{
    console.log(chalk.red("Please enter a word to know the meaning"));
}
}
catch(error){
console.log(chalk.red("Meaning Not Found, \n(1)Kindly check spelling and Try again\n(2)Don't Enter empty words"));
}
}
printMeaning(input[2]);
export default printMeaning;
Don't be afraid I will explain you each and every line in this file.
Code Explanation
import chalk from 'chalk';
import is a keyword used in modular programming, it simply import other packages as module in our index.js file. Modules are piece of code usually functions and classes which returns objects or methods to use in our current projects.
NPM chalk is a third-party Node.js module that is used to add color and styling to text on the command-line output. It also allows creating your own themes for your Node.js project.
const input = process.argv;//Read argument(s) in form of array from terminal
Then we create a input variable where we assigned process.argv , what it does is, it returns an array of commands we type in the terminal.
For example:
$ node index.js -v
And you try to display the output of input variable by console.log(input) you will get this:
[
  '/home/farhan/.nvm/versions/node/v20.9.0/bin/node',
  '/home/farhan/OpenSource Contribution/BLogsNotes/word-meaning/index.js',
  '-v'
]
Now you can get whatever command you want in the code for your statements to process. Like I need "-v" if user enter "-v" the code should display the version of our program. If user enters "-h" user should get the help information and if user enters any word other than that he should get the meanings of their inputted word if any was found from the API.
So that's why I used input[2] for these tasks because I need the third argument after the node index.js.
Now the controller of this tool is printMeaning function with word signature or parameter. Our function is and should be a async because we gonna fetch the remote API data.
Now it's try and catch turn. try and catch are keywords used to make exception handler, it's very common in most programming languages. It's like this
try{
//Run this for the first time and execute...
}
catch{
//If error occurs run this
}
So obviously we try our code first in try block and if any error occurs which will occur for sure because we are using the remote API execute the catch statements. Key advice always use exception handling when dealing with APIs.
Rest is self-explanatory you can understand if you know javaScript.
Deploy our tool in NPM
To deploy our package in npm you need to make a account in npmjs website. After making account with npm. First you should initialize your project as npm package as we did before. Now login with npm by
npm login
You will get a prompt to enter your username and password. If login is successful, you should see a message like this
Logged in as <your-username> on https://registry.npmjs.org/.
You can now run the following command to publish your package on the NPM registry by simply put this in terminal
npm publish
If all goes well, you should get results similar to the screenshot below:
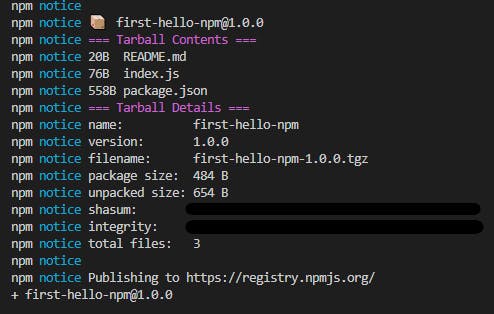
If you have been following along, then congratulations! You just published your first NPM package.
One thing to remember is, you can't republish the same code again with same version. If you made any changes in the code or add new feature, you should change the version number in the package.json file and then type
npm publish
Then only you can see the changes in your tool in real life.
Installing tool in your local machine
To install of your newly made tool simply put this in the terminal
npm i word-meaning -g
npm --> to tell this is a npm command
i --> to install the next package
word-meaning --> package to install
-g ---> install this package globally not just in any specific directory
Alright guys this is all we need to solve our word searching problem in terminal so that you don't waste your time in browser as I did before. Also give me any feedback I need to work on, it will allow me to look in my own fault and I try my best to avoid in this blog awa in the future blogs.
Now it's time to leave. Feel free to ask questions and please kindly follow my newsletter for more blog like this.Thank you very much for reading.
Happy programming. Wish you all the best.